Boat pose is one of those yoga moves that’s as hard as it looks…if not harder. The exercise—which involves balancing on your butt while you reach your arms forward and extend your legs, all while holding as still as possible—is a serious core challenge. To do it correctly, you need to fire up essentially every muscle in your midsection, plus some in your legs, back, and arms too.
The level of strength needed to pull this off is pretty high, which is why mastering this move is no easy feat. But take the time to do it and you may see some pretty big payoffs, including decreased back pain, stronger hip flexors, and a priceless sense of empowerment.
To that end, we chatted with Candace Harding, PT, DPT, a physical therapist and a registered yoga teacher in Arlington, to learn all you need to know about boat pose. From which muscles it works, to its awesome benefits, what makes it so damn hard, common form errors to avoid, and step-by-step instructions for doing it properly (plus a more beginner-friendly modification), here’s your complete guide to boat pose.
What muscles does boat pose work?
People tend to think of boat pose as a core exercise, Dr. Harding tells SELF. And they’re not wrong: To get into the posture, you need to fire up your rectus abdominis (frontside abs), she explains. Then, once you’re there, you need the strength of all your abdominal muscles to hold steady, including the obliques (muscles on the sides of your torso) and transverse abdominis (deep core muscle that wraps around your spine and sides), Dr. Harding says.
But there are more muscles at work too. Your hip flexors—specifically the psoas major and iliacus (which bring your thighs closer to your body)—are firing to keep your legs hoisted and hold your torso in that upright position, Dr. Harding says. At the same time, players in your back—including the erector spinae (muscles that help arch your spine) and lats (biggest back muscle)—are pitching in to help you maintain an upright posture through your spine, she adds. And while it’s definitely not an arms exercise, those muscles are peeking into the party, too, since traditional boat pose has you holding them out straight in front of you, Dr. Harding says.
What are the benefits of boat pose?
Given the intense core activation required to nail boat pose, it’s no surprise this move is great for bolstering your midsection muscles. And that, in turn, can help alleviate back pain by fortifying the deep trunk muscles that support your spine. To maximize this benefit, think about subtly drawing your belly button in toward your back, Dr. Harding says. This will help activate more of your transverse abdominis, which stabilizes your back and can contribute to chronic pain there if it’s not firing correctly.
Boat pose can also help with back pain if you have weak hip flexors. Ideally, you want a balance between them and the opposing muscle group (your butt), but if your glutes are way stronger, they can pull your back into a more rounded position, Dr. Harding explains. And that can trigger the aches. Enter boat pose: Since it’s great for activating your hip flexors, it can bolster this muscle group so that it’s more balanced with the glutes, potentially relieving related back pain.
A few caveats to all this. The first: Hip flexors that are too tight can also contribute to back pain, since they can pull your pelvis forward, which puts your back into a more exaggerated arch, Dr. Harding explains. Similar to a back that’s yanked into a rounded position, this can cause discomfort. With boat pose, you’re holding your hip flexors in a shortened position, so if that muscle group is already too tight, then hanging out in boat pose is only contributing to the problem.
Beyond the back pain benefits, boat pose can hone your ability to breathe properly while simultaneously engaging your core. This is something a lot of people can struggle with, Dr. Harding says. But it’s an important skill to have, since it allows you to keep a steady flow of oxygen coming in (which keeps your nervous system in a calm, happy state) while bracing your core. This comes in handy in a lot of everyday-life scenarios where you want to fire up your abs but you also, uh, want to keep breathing—like bending over to pick up a heavy object, for example.
Lastly, boat pose can imbue you with a pretty awesome sense of accomplishment, Dr. Harding says. “Depending on how long you’re staying there, it really is a challenge,” she explains. And powering through that difficulty can leave you feeling strong and capable.
What makes boat pose so hard?
It’s not just you—this pose is a doozy for a lot of people. One reason why? The challenge of breathing while your abs are braced, Dr. Harding says. “Whenever we’re focused really hard on something, we have a tendency to hold our breath,” she explains. “Also, when we hold our breath, our muscles don’t have as much oxygen to actually work.” So the longer you hold your breath in boat pose, the harder (and harder) the move becomes.
Another reason it’s so tough is that it demands a lot of strength from your spinal erectors, which help you hold a flat back in the posture. Unfortunately, a lot of people are weak in these muscles due to lots of time spent sitting with rounded posture. That habit, Dr. Harding explains, lengthens all your backside muscles and makes them harder to activate when you need them—say, like in boat pose.
The good news: You can ease up the difficulty of boat pose with several modifications. The most common is bending one (or both) legs instead of holding them straight, Dr. Harding says. You can also place your hands behind your hips instead of reaching them out in front of you. With either of these tweaks, you’re reducing the core challenge, which makes the posture less intense.
What are some form mistakes to keep in mind?
The most common boat pose error, according to Dr. Harding, is rounding your back instead of keeping a straight spine. This can happen when you don’t engage the muscles on the backside of your body and instead just rely on your abs to do all the work. It can also occur if your abs aren’t strong enough to hold your legs out straight, she explains. To correct it, think about lifting through your heart as you hold the posture; this cue can help straighten out your back. If that doesn’t work? Modify the posture by bending your knees to return the strain on your abs.
Another common mistake is not lifting your legs high enough. In this scenario, your body would look more like an L-shape than a V-shape. People often do this because they don’t have the hip flexor strength to hoist their legs up high enough, Dr. Harding explains, but it’s something you want to avoid since holding the legs too close to the ground can risk straining your hip flexors. If this is you, modify by bending both your legs.
Then there’s your breath—tempting as it may be, do not hold it. Not only does this limit oxygen supply to your muscles, ultimately making the move feel even harder (like we mentioned), but it also cuts out some of the awesome core activation, Dr. Harding explains. So remind yourself to breathe. If that doesn’t work, think about relaxing your face and neck, as this can get oxygen flowing. Still having trouble inhaling and exhaling? Try one of the modifications mentioned above. If your body’s working too hard, then you’re not going to be able to relax and breathe, Dr. Harding explains, in which case lowering the intensity of boat pose may be just the ticket.
Who shouldn’t do boat pose?
Awesome as it may be, boat pose isn’t for everyone. If you’re pregnant and at the point where your belly is jutting into the area where your legs would normally be in this posture, then you should skip it, Dr. Harding says. People with osteoporosis or osteopenia (two conditions that cause bone weakness) should be careful with it, since they’re at increased risk of compression fracture when flexing their spine. Form is extra crucial there: That’s why she recommends folks in that category do boat pose with a mirror positioned to the side, so they can turn their head periodically to check that their spine is staying straight (instead of rounding it forward, which would be problematic).
If you have back pain related to stiff hip flexors, Dr. Harding suggests steering clear of this posture—at least for now. It may be something that’s helpful down the road, “but it would not be an early intervention,” she explains.
Along those lines, if your back pain feels worse after boat pose, stop doing it and get checked out by a doctor or physical therapist. Also see a professional if your pain has been lingering for two weeks and it hasn’t changed despite doing boat pose or any other core exercises, Dr. Harding advises.
How to do boat pose:
Katie Thompson
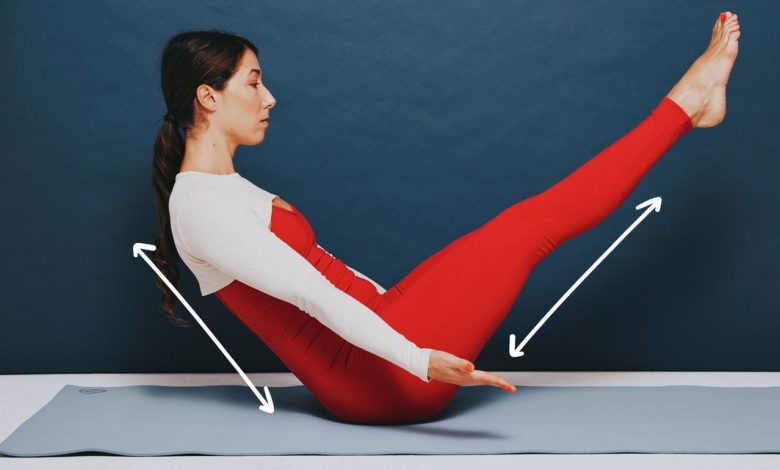
- Sit up straight on a mat with your legs bent, feet flat on the floor.
- Place your hands behind your hips and shift your weight back slightly so that your feet lift off the ground. Keep your weight balanced on your sit bones.
- Inhale to lift your arms so they are parallel to the floor or angled slightly down (as shown), palms facing up. Engage your entire core and lengthen through your spine so that your back is one straight line. Balance on your tailbone, and straighten your legs. Your body will form a V-shape.
- Hold for as long as you’re able to breathe normally while keeping your face and neck relaxed. This is a good way to personalize the duration to what works for you. Otherwise, aim for up to 30 seconds.
How to do modified boat pose:
Katie Thompson
- Sit up straight on a mat with your legs bent, feet flat on the floor.
- Place your hands behind your hips and shift your weight back slightly so that your feet lift off the ground. Keep your weight balanced on your sit bones.
- Inhale to lift your arms so they are parallel to the floor or angled slightly down (as shown), palms facing up. Engage your entire core and lengthen through your spine so that your back is one straight line. Balance on your tailbone, and bring your shins parallel to the floor with the knees still bent.
- Hold for as long as you’re able to breathe normally while keeping your face and neck relaxed. This is a good way to personalize the duration to what works for you. Otherwise, aim for up to 30 seconds.
Demoing the moves above is Natalia Perez-Segnini, a yoga teacher, certified functional and therapeutic breathwork practitioner, and strength and conditioning coach.
Related:
- The Superman Exercise Is the Core Move Your Workout Might Be Missing
- How to Do the Clam Shell Exercise to Fire Up Your Side-Butt
- How to Start 6 Weeks to Stronger, SELF’s All-New Workout Program
Get more of SELF’s great fitness coverage delivered right to your inbox—for free.